Wendy Davies
One of the most common things I find myself doing is re-designing or re-purposing some of my existing pieces of jewellery. This isn’t because of my bad workmanship – well, mostly – but because I’d like something the same-but-different or simply because I can. (This is one of the privileges of having the skills – and confidence – of knowing what to do and how to go about it. Something I pass on to my students when they attend my classes.) Then there are those times when I’ve worn the piece so often, that it breaks.
So today, I’m going to show you how I go about approaching this task, hoping that it will inspire you to consider your own jewellery pieces in a completely different light.
Broken at first
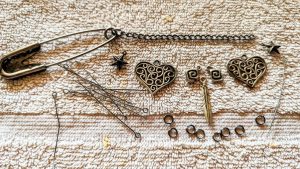
First, let me introduce you to the piece I will be using, in its current sad, broken state of being:
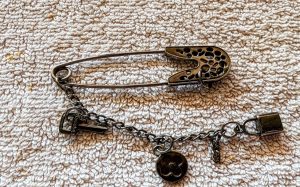
This pin was given to me as a present a while ago. (Which means I didn’t make it so the fact it broke had nothing to do with me!) I’ve mainly used it to secure a scarf, or a vest or a cardigan, which had no fasteners. So, when it broke (something I could have easily – and quickly – fixed myself), I thought this might be an opportunity to make it “mine” by turning it into a piece I created, not made by someone else.
Picking out what’s best.
First, I thought about what I liked and didn’t like, about this particular piece.
To me, its simplicity was both a plus and a minus. It needed more, but what that ‘more’ was wasn’t clear.
The pin part was integral to the whole thing so that had to stay (and luckily I really liked it as well). I didn’t mind the chain, so I could happily reuse that. The lock, key, and round bits – not so much. They didn’t mean anything to me and held no significance. So, maybe I could simply change them, keeping the same kind of design as before, but using beads that were special and significant just to me?
Up for Redesign.
That’s when my brain began ticking over, meaning I was going to redesign the pin, not just fix it – keeping it exactly the same as it’s always been.
So, the next thing I did was take the whole thing apart.
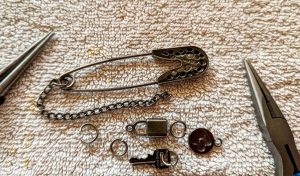
This step helps you “see” the entire piece in a completely different light. It breaks the piece down into its individual bits. It allows you to see each individual ‘tree’ within the forest of the overall piece. It helps you ‘discover’ (or rediscover) each bead and every single thing that went into making the original piece.
Repurpose old favourites
Once it was apart, it became even clearer that this pin definitely needed more to make it a satisfying piece of jewellery. So, I hunted through my beads – discovering some Celtic circles, some stars, and even the odd feather pendant. I also found two Celtic hearts I had forgotten I even owned. I have Irish blood flowing through my veins – my mother’s maiden name was Murphy– so I knew I had found that ‘more’ I was looking for.
Or, more accurately, I’d found more than enough to satisfy my quest for more…
The fun starts
Now the fun part begins – at least for me – setting about designing how the end piece will end up looking. This is the creative part. Something every person approaches differently, which is fine, interesting, and simply wonderful. But for me, it means (mostly) ‘playing’ with my chosen beads to see how they’ll go together and what combination pleases me the most.
After a bit of playtime, my design still wasn’t quite there yet. Nevertheless, I started putting it all together, attaching the stars first because I knew they belonged exactly where they were.
Persevere for a great ending.
I would love to say that the entire thing went together without a hitch. But that rarely happens, and it certainly didn’t this time either. It took me a few more tries – and much longer than it should have done – before I was happy with the result.
The lesson here is it’s better to spend more time playing (and designing) your piece before you jump in and start making it. Something I tell my students all the time.
And something I obviously need to take heed of myself.
Satisfied
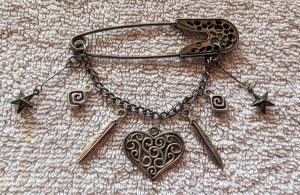
Anyway, this is what I ended up with:

Yes, it’s more ‘complicated’ than the original simple pin, but that’s exactly what I wanted. It will look stunning on my black scarf, my purple cardigan, and my red vest – the bits of clothing I always wear this pin with.
Or I could just ‘simplify’ it back to my initial design and remove those extra circles and stars and put a loop on the heart instead of dangling down as it currently does. …I guess I’ll decide if I’ll change it again once I’ve worn it out and gauge other people’s reactions.
Now, if you’d like to know the intricate details of how to go about doing something like this with one of your own bits of jewellery, well, you’ll have to join one of my beginner jewellery classes at the Thurgoona Community Centre. These classes are held over six weeks on a Friday. You don’t need anything, just your enthusiasm, to start. So, contact the Centre for more information on 6043 1588 including when the next classes will start.
Check out course details at Jewellery Making Classes